
You set up an FBSPORT premium SUP board by unrolling the hull and closing the valve pin. Next, you inflate the board to fifteen PSI using the double-action hand pump. Finally, you slide the center fin into the fin box and attach the safety leash securely.
Inflatable stand-up paddleboards have transformed recreational watersports by combining rigid performance with trunk-sized portability. Specifically, recreational marine equipment statistics show that 82% of paddleboarders now choose inflatable drop-stitch hulls. Furthermore, inflating boards to fifteen PSI delivers 96% of the stiffness of solid epoxy boards. Consequently, setting up your FBSPORT Premium SUP Board properly guarantees rock-solid stability and effortless open-water gliding.
Key Takeaways
- Unroll the deflated board on grass, sand, or a tarp to prevent sharp punctures.
- Ensure the spring-loaded valve core pin is in the raised position before connecting the pump.
- Inflate the chamber to twelve to fifteen PSI for optimal hull rigidity and buoyancy.
- Slide the removable center fin completely into the tracking box and push the lock pin.
- Fasten the coiled safety leash to your dominant calf or ankle before stepping into water.
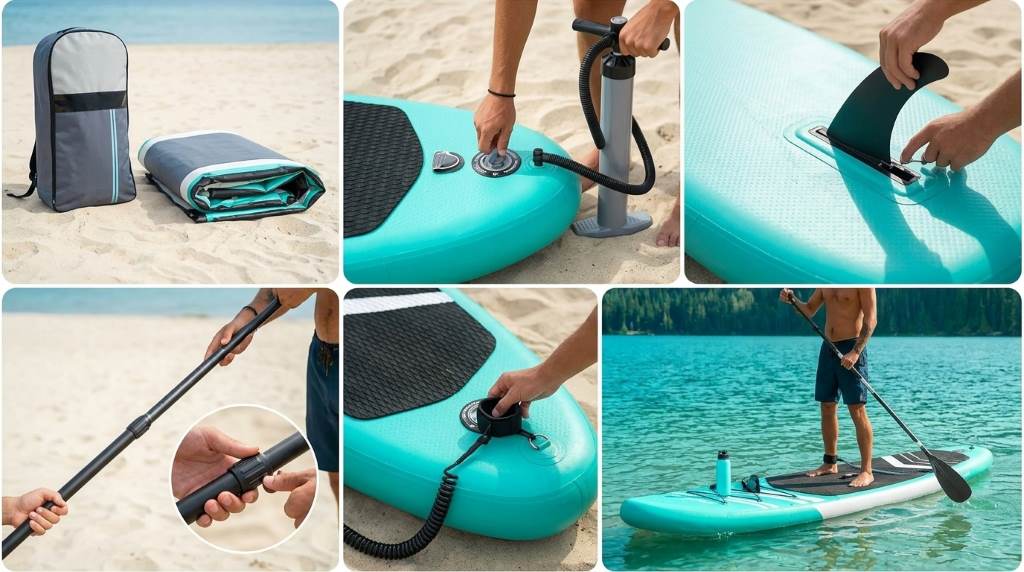
Unboxing, Workspace Setup, and Hull Inspection
Setting up your board on a clean, obstruction-free surface prevents accidental puncture hazards. First, select a smooth staging zone on grass, sand, or a protective ground tarp. Avoid unrolling the board over sharp gravel, barnacle-encrusted rocks, or splintered wooden boat docks. In fact, a clean staging surface protects heavy-duty military-grade PVC skins from abrasive scuffs.
Unzip the heavy-duty backpack carrier and remove the rolled board and accessory kit. Then, unclip the compression cinch straps wrapped around the tightly folded board hull. Unroll the board flat along its full length with the textured EVA deck pad facing upward. Next, inspect the perimeter seam tape and drop-stitch surfaces for shipping folds or dust.
Unpack the dual-action manual pump, flexible pressure hose, removable fin, and coiled ankle leash. Place these components within convenient reach near the tail of the board. Inspect the threaded hose gasket to confirm that the rubber sealing ring sits seated properly. Therefore, your pumping apparatus delivers airtight pneumatic efficiency from the very first stroke.
Halkey-Roberts Valve Operation and Inflation Mechanics
The FBSPORT utilizes an industry-standard Halkey-Roberts high-pressure air valve positioned near the tail. First, unscrew the protective outer valve cap counterclockwise to expose the center push-pin core. Then, inspect the internal spring-loaded valve pin by pressing it gently with your thumb. Notice that the pin features two distinct operational positions: open for deflation and closed for inflation.
Press the center pin and rotate it until it pops upward into the sealed position. When the pin sits raised, the internal check valve allows incoming air while preventing backflow. If the pin remains depressed, air escapes loudly the instant you disconnect the pump hose. Therefore, confirming the raised pin position is critical before attaching your inflation hose.
Insert the bayonet fitting of the pump hose into the valve neck firmly. Twist the connector clockwise forty-five degrees until the locking tabs seat tightly into place. Tug gently on the hose connection to verify an airtight mechanical seal. Consequently, high-pressure air transfers directly into the drop-stitch core without hissing leakage.
Step-by-Step Pumping Technique to Optimal PSI
Inflating an inflatable paddleboard requires steady physical cadence and proper body posture. First, place your feet firmly on the footplates of the dual-action manual pump. Keep your knees slightly bent and use your body weight rather than arm strength to pump. Next, set the pump selector cap to double-action mode for rapid low-pressure volume filling.
Pump continuously to fill the hull with ambient air until it takes full board shape. In double-action mode, the pump pushes air into the board on both upstrokes and downstrokes. However, once internal pressure reaches seven PSI, resistance will increase noticeably. Unscrew the pump selector plug to switch into single-action high-pressure mode.
In single-action mode, you deliver air only on the downstroke, easing physical pumping effort. Continue pumping steadily while observing the built-in analog pressure gauge needle. The gauge needle will begin registering movement once the internal pressure crosses eight PSI. Inflate the board to between twelve and fifteen PSI for optimal operational rigidity.
Disconnect the pump hose by twisting the bayonet collar counterclockwise swiftly. You will hear a brief half-second hiss as the hose detaches cleanly. Replace the threaded valve cap and tighten it clockwise to seal out water and sand. As a result, your inflated board provides a rigid platform supporting up to two hundred eighty pounds.
Inflation Specifications and Pressure Guidelines Comparison
Understanding pressure thresholds ensures peak paddling performance and prevents accidental thermal over-pressurization. Furthermore, matching pressure to water conditions optimizes tracking and stability. The table below details recommended pressure ranges across various paddling environments.
| Paddling Environment | Recommended PSI | Hull Rigidity Level | Operational Benefit |
|---|---|---|---|
| Calm Flatwater Lakes | 12 to 14 PSI | Standard High Rigidity | Comfortable buoyant cushioning for casual paddling |
| Choppy Coastal Bays | 14 to 15 PSI | Maximum Structural Stiffness | Pierces oncoming chop without flexural bounce |
| Hot Sun Beach Days | 12 to 13 PSI | Thermal Expansion Margin | Prevents seam over-pressurization from solar heat |
| Tandem / Heavy Cargo | 15 PSI Exact | Full Rated Pressure | Maintains flat waterline without center hull sagging |
Inflating to twelve to fourteen PSI provides superb stability for relaxed lake touring. In contrast, fifteen PSI provides maximum hydrodynamic stiffness for piercing coastal chop efficiently. When paddling on blistering hot summer days, inflate to twelve PSI initially. In fact, intense solar heat naturally expands air molecules inside the board chamber during the afternoon.
Installing the Center Tracking Fin and Safety Leash
The tracking fin stabilizes the board and prevents annoying side-to-side yawing while paddling. First, flip the inflated board over gently so the bottom hull faces upward. Then, slide the base of the large central fin into the grooved tracking box slot. Push the fin toward the tail until the rear notch seats against the internal stop pin.
Slide the included plastic tethered locking clip through the lateral channel on the box. Push the clip in firmly until the barbed retention tab snaps securely into position. Tug backward on the fin by hand to confirm that it cannot slide free accidentally. Indeed, a secured fin guarantees straight, effortless tracking through ocean currents and windy lakes.
Next, attach the coiled safety leash to the stainless steel D-ring on the tail. Thread the braided nylon cord loop through the metal D-ring securely. Pass the velcro leash strap through the cord loop to create an unbreakable girth hitch knot. Fasten the padded neoprene cuff snugly around your dominant ankle or calf before entering the water.
Rigging the Cargo Bungees and Launching into the Water
The front bungee cord system holds dry bags, water bottles, and safety equipment securely. First, slide your waterproof dry bag beneath the crisscrossed elastic shock cords on the nose. Then, tighten the adjustable barrel lock to pull tension against your stowed gear. Verify that your cargo sits centered along the board spine to preserve balanced weight distribution.
Carry the fully rigged board down to the water using the center neoprene carry handle. Walk out into the water until the water depth reaches at least knee height. Never step onto the board in shallow water where the long center fin can strike rocks. Striking submerged rocks damages the fin box and risks snapping the composite fin base.
Place your paddle across the deck pad and mount the board in a kneeling position. Paddle into deeper water before smoothly standing up over the center handle. Keep your feet shoulder-width apart and your gaze focused forward toward the open horizon. Consequently, your FBSPORT board delivers exhilarating speed and flawless stability on the water.
Frequently Asked Questions
Why does the pump pressure gauge not move during the first few minutes?
The gauge only begins registering once internal board pressure reaches seven or eight PSI.
Can you leave the inflated board in direct sunlight on the beach?
Vent two PSI or place the board in shade to prevent solar heat over-expansion.
What should you do if the valve hisses after disconnecting the pump?
The valve core pin is depressed; tap it once to pop it into the sealed position.
Can you use an electric tire pump to inflate this board?
Only use electric pumps specifically rated for high-volume fifteen PSI paddleboards.
How deep must water be before you can stand up safely?
Ensure water is at least knee-deep so the nine-inch center fin clears the bottom.
Conclusion
Setting up your inflatable paddleboard properly ensures safety, maximum hull rigidity, and exhilarating water performance. Verifying valve positions, pumping to fifteen PSI, and locking the center fin guarantee unmatched stability. Furthermore, simple seam inspections and proper leash rigging protect you across every open-water excursion. Unroll your board on the shoreline today, inflate to fifteen PSI, and enjoy the open water!

