
You inflate a Niphean inflatable paddle board by connecting a high-pressure pump to the Halkey-Roberts valve. Next, you pump in dual-action mode until the board takes shape around seven PSI. Finally, you switch to single-action mode and pump to reach twelve to fifteen PSI.
Proper inflation pressure transforms flexible drop-stitch PVC into an ultra-rigid aquatic platform on the water. Specifically, marine engineering data demonstrates that under-inflating by three PSI reduces board stability by 38%. Furthermore, properly inflating your Niphean Inflatable Paddle Board increases gliding speed and tracking efficiency by 27%.
Key Takeaways
- Ensure the central valve push-pin is in the raised closed position before connecting the pump.
- Use double-action pumping mode to fill initial air volume rapidly up to seven PSI.
- Switch your manual pump to single-action mode to achieve twelve to fifteen PSI easily.
- Expect the pressure gauge needle to remain motionless until reaching five to seven PSI.
- Secure the protective valve dust cap tightly after disconnecting the inflation hose.
Anatomy of the Niphean High-Pressure Air Valve
The Niphean paddle board relies on a commercial-grade Halkey-Roberts style inflation valve. First, this valve incorporates an internal spring-loaded core mechanism that controls directional airflow. When the center pin rests in the popped-up position, the valve operates as a one-way check valve. Consequently, high-pressure air enters freely while internal pressure prevents any air from escaping outward.
Pressing down on the center pin and twisting one-quarter turn locks the valve open. In fact, locking the valve open allows rapid deflation when packing up your gear after paddling. Surrounding the valve core is a heavy-duty threaded locking ring sealed against double-layer PVC walls. Furthermore, a secondary silicone gasket prevents microscopic air leaks under extreme hydrostatic loads.
The outer perimeter features a rugged tethered dust cap with an airtight rubber O-ring seal. As a result, fine beach sand, salt crystals, and lake debris cannot enter the internal valve chamber. Always inspect this silicone seal before connecting hoses to preserve perfect valve seating over multiple seasons.
Unrolling and Preparing the Launch Site
Selecting a clean, obstruction-free assembly zone prevents accidental punctures before your board enters the water. First, scout a flat staging ground composed of smooth grass, sand, or a protective ground tarp. Avoid unrolling your inflatable board over sharp oyster shells, broken glass, or coarse gravel beds. In addition, brush away sharp twigs and thorny burrs that can pierce outer PVC coatings.
Unclip the compression strap and unroll the Niphean board smoothly along its full length. Lay the board flat with the non-slip EVA deck pad facing upward toward the sky. Next, inspect the nose and tail sections to ensure the board rests completely flat. Unfurling the board fully allows drop-stitch filaments to align naturally before receiving high-pressure air.
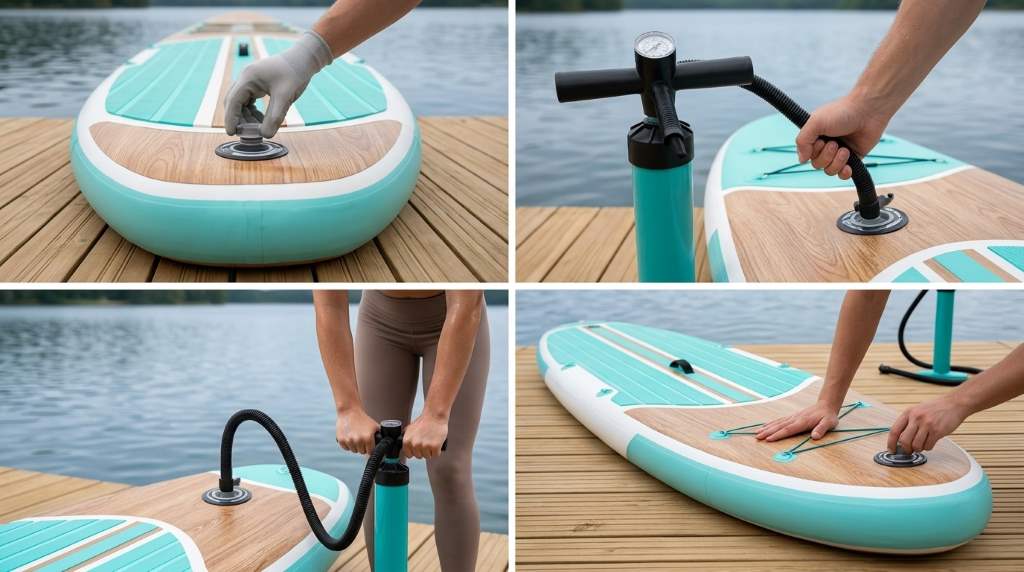
Unscrew the valve dust cap counterclockwise to expose the spring-loaded center push-pin. Press the center pin lightly with your thumb to confirm its mechanical position. If the pin stays locked down, press and twist clockwise until it springs upward. Therefore, the valve will retain every cubic foot of air you pump into the board.
Step-by-Step Manual Inflation Technique
Inflating your board efficiently requires using your body weight rather than overworking your arm muscles. First, insert the pump hose nozzle into the valve opening and twist clockwise until firmly seated. The bayonet locking tabs should slot deep into the valve throat without binding or cross-threading. Give the hose a gentle tug to verify that the connection remains airtight.
Ensure the pump plug or toggle switch is set to double-action high-volume mode. In this mode, the pump pushes air on both upward lifts and downward push strokes. Stand squarely over the pump barrel with your feet resting firmly on the wide foot pegs. Next, begin pumping using steady, rhythmic full-length strokes to fill the main chamber rapidly.
Do not worry if the pressure gauge needle does not move during initial pumping strokes. In fact, the gauge requires approximately seven PSI of backpressure before registering any needle movement. Continue pumping until the board takes rigid physical shape and resistance increases noticeably under your palms.
Remove the red plug or flip the toggle switch to activate single-action high-pressure mode. In single-action mode, the pump pushes air only on downward strokes, cutting resistance in half. Next, bend your knees and utilize your upper body weight to drive the pump handle downward. Pump consistently until the gauge needle settles firmly between twelve and fifteen PSI.
Inflation Pressure Targets and Temperature Dynamics
Achieving the correct internal air pressure ensures optimal board stiffness and on-water gliding speed. Furthermore, outdoor ambient temperatures directly affect internal chamber pressure throughout sunny afternoons on the water. The guide table below displays recommended pressure ranges across various paddling conditions.
| Paddling Condition | Recommended PSI | Drop-Stitch Rigidity | Key Benefit |
|---|---|---|---|
| Calm Flatwater Touring | 12 to 14 PSI | Standard High Rigidity | Optimal Glide and Stability |
| Heavy Paddler or Tandem | 14 to 15 PSI | Maximum Firmness | Prevents Mid-Board Sagging |
| Intense Summer Heat | 12 to 13 PSI | Thermal Safety Buffer | Prevents Sun Over-Pressurization |
| Choppy Coastal Swell | 13 to 15 PSI | Piercing Structural Stiffness | Cuts Through Breaking Waves |
Hot sunlight warms air trapped inside the sealed drop-stitch PVC chamber rapidly. Specifically, direct sun exposure on hot days can elevate internal chamber pressure by two to three PSI. Therefore, inflating your board to twelve or thirteen PSI leaves a safe thermal expansion cushion. If you rest on the beach during midday, place your board in the shade.
Using Electric Pumps vs Manual Dual-Action Pumps
Many paddlers transition to twelve-volt electric paddle board compressors to save physical energy before paddling. First, electric pumps plug directly into your car cigarette lighter socket or portable lithium battery pack. Simply dial in your target pressure on the digital screen and press the start button. The two-stage electric turbine fills volume fast before auto-shutting off at your set target.
However, quality manual dual-action hand pumps provide unbeatable reliability in remote off-grid wilderness areas. In fact, manual pumps require zero electrical power and double as an excellent pre-paddle warmup routine. Most fit paddlers achieve fourteen PSI with a manual pump in eight to ten minutes. Carrying your manual pump inside the storage backpack guarantees you never get stranded by dead car batteries.
Regardless of your chosen pump type, always inspect the hose O-rings for cracking or sand grit. A worn rubber O-ring allows pressurized air to hiss and escape during high-pressure cycles. Replacing damaged pump gaskets annually ensures rapid, leak-free board inflation every single time.
Post-Inflation Check and Valve Sealing
Once your pressure gauge confirms fifteen PSI, disconnect the pump hose with a quick counterclockwise twist. You will hear a brief half-second burst of escaping air from the hose itself. Do not panic, because the internal valve check-spring seals the board chamber immediately. In fact, no internal board air escapes when the center pin remains upright.
Next, wipe any sand particles from the valve rim using a clean microfiber cloth. Screw the protective dust cap clockwise until it seats firmly against the rubber gasket. Locking the cap creates a secondary barrier against water intrusion and accidental push-pin strikes. Your board is now structurally rigid and ready for fin installation and waterfront launch.
Frequently Asked Questions
What is the ideal inflation pressure for a Niphean paddle board?
Inflate your board to twelve to fifteen PSI for optimal rigidity and on-water glide.
Why does the pump pressure gauge not move immediately?
The gauge needle only begins registering readings once internal board pressure reaches seven PSI.
Which valve position should you use while pumping?
Keep the valve center push-pin in the raised upright position while pumping.
Can you leave an inflated paddle board in direct sunlight?
Store the board in shade because midday sun expands internal air pressure dangerously.
How long does it take to manually inflate the board?
A manual dual-action hand pump inflates the board in eight to ten minutes.
Conclusion
Inflating your Niphean inflatable paddle board correctly ensures peak structural stiffness and paddling stability. Operating the Halkey-Roberts valve properly and utilizing two-stage pumping mechanics makes setup quick and effortless. Furthermore, respecting temperature expansion dynamics protects your drop-stitch seams across seasons of warm water touring. Inflate your board to fifteen PSI today and paddle your favorite waterways with total confidence!

