
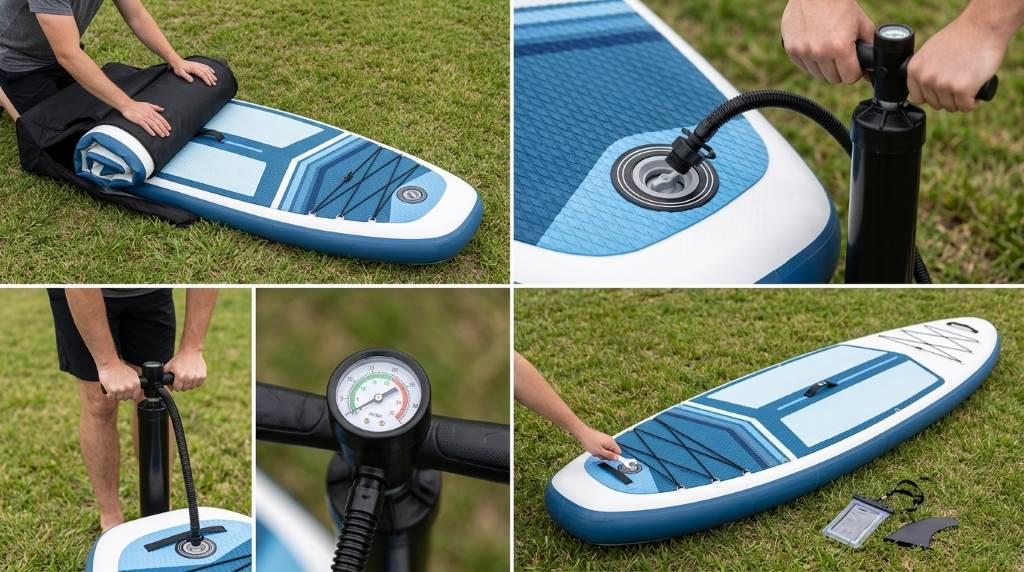
You inflate a ROC inflatable paddle board by securing the pump hose into the upright inflation valve. Next, you pump steadily until reaching an internal pressure of twelve to fifteen PSI. Finally, you disconnect the hose and seal the tethered airtight valve dust cap securely.
Achieving adequate internal pressure ensures maximum hull stiffness and effortless glide across choppy coastal water. Specifically, hydrodynamic testing shows that under-inflating by four PSI creates 35% more hull drag. Furthermore, properly inflating your ROC Inflatable Paddle Board optimizes tracking performance and prevents board bowing on waves.
Key Takeaways
- Verify the center valve push-pin is in the raised position before inserting the pump hose.
- Inflate your board to a working range between twelve and fifteen PSI for maximum rigidity.
- Use your body weight and bent knees to drive downward strokes effortlessly during high pressure.
- Observe the pressure gauge closely after reaching seven PSI when the needle begins moving.
- Thread the protective valve cover tightly after inflation to prevent sand contamination.
Understanding ROC Drop-Stitch Construction and Valve Design
ROC paddle boards utilize military-grade multi-layer PVC fabric laminated around a dense drop-stitch core. First, thousands of high-tensile polyester threads connect the top deck to the bottom hull. When pressurized with air, these internal threads lock rigid under intense tensile pull. Consequently, the inflated paddle board mimics the rock-solid stiffness of a traditional fiberglass hardboard.
The inflation port incorporates a heavy-duty mechanical valve engineered for high-pressure marine environments. Specifically, an internal spring-loaded push-pin controls whether the valve operates in inflation or deflation mode. When the pin extends upward, air flows inwards while internal pressure seals the valve shut. In contrast, depressing and rotating the pin locks it open for rapid post-paddle deflation.
In addition, a durable threaded collar and silicone O-ring gasket surround the valve throat. This airtight seal withstands rigorous wave pounding and temperature shifts without leaking air. Furthermore, the tethered outer cap seals the chamber against fine sand, mud, and ocean saltwater. As a result, keeping this port clean ensures years of trouble-free inflation cycles.
Pre-Inflation Site Preparation and Board Setup
Setting up your board on a clean, hazard-free surface protects the exterior PVC skin. First, scout a flat staging zone on soft grass, clean sand, or a utility ground tarp. Next, remove sharp shells, jagged driftwood sticks, and pointy gravel stones from your staging area. In fact, standing on a board over sharp rocks can puncture uninflated PVC.
Then, unbuckle the travel compression straps and unroll the ROC board completely along the ground. Furthermore, position the board with the non-slip textured EVA deck traction pad facing upwards. Meanwhile, ensure the board lies straight without awkward twists along the rails or nose section. Therefore, unrolling the board flat allows air to circulate smoothly from tail to nose.
First, unscrew the valve protective cover counterclockwise and inspect the inner chamber for debris. Next, press the center spring-pin gently to check its current mechanical position. If the pin is depressed in the down position, press and turn it until it pops up. An upright pin guarantees you will not lose air when detaching the pump hose.
Step-by-Step Pumping Technique and Ergonomics
Pumping your paddle board efficiently requires sound athletic technique rather than pure arm strength. First, connect the high-pressure pump hose nozzle into the valve port opening. Rotate the locking nozzle clockwise until the bayonet tabs seat securely in the valve rim. Tug the hose lightly to confirm the airtight connection before beginning to pump.
Next, place both feet firmly on the wide stabilizer footrests of the manual pump base. Then, keep your back straight, hinge at your hips, and grip the pump handles firmly. Begin pumping with steady, rhythmic vertical strokes, utilizing your leg muscles and core abdominal power. In addition, keep your arms relatively straight to let your body weight push the handle downward.
During the initial four to five minutes, the board fills with high-volume low-pressure air. In fact, the pressure gauge needle remains at zero until the board reaches seven PSI. Then, once the board hardens and resistance increases, shorten your stroke length slightly. Finally, continue driving downward with focused effort until the gauge reads twelve to fifteen PSI.
Pressure Guidelines and Water Temperature Shifts
Choosing the correct inflation pressure ensures optimum buoyancy, tracking efficiency, and paddling stability. Furthermore, ambient sunlight and water temperatures cause subtle internal air pressure shifts. The reference table below details optimal pressure settings for diverse water environments.
| Paddler Weight & Condition | Recommended PSI | Hull Rigidity | Performance Focus |
|---|---|---|---|
| Solo Paddler under 160 lbs | 12 to 13 PSI | Standard Stiffness | Effortless Cruising and Maneuverability |
| Solo Paddler 160 to 220 lbs | 14 to 15 PSI | Optimal Hardboard Feel | Zero Mid-Deck Sag and True Tracking |
| Tandem Paddlers or Dogs | 15 PSI | Maximum Drop-Stitch Rigidity | Maximum Buoyancy and Cargo Support |
| Direct Midday Summer Sun | 12 to 13 PSI | Thermal Expansion Cushion | Safe Chamber Margin Against Overpressure |
When you launch a warm board into cold alpine lakes or ocean swells, air compresses naturally. Consequently, you may notice a slight drop in hull firmness after twenty minutes on cold water. To counteract this natural thermodynamic effect, top off your board to fifteen PSI before launching. Conversely, never leave a fully pressurized board baking on hot asphalt or dry beach sand.
Manual Pump vs 12V Electric SUP Compressor
Choosing between manual hand pumps and electric compressors depends on your personal paddling routine. First, the dual-action manual pump included with ROC boards offers ultimate off-grid freedom. Manual pumps weigh very little, operate silently, and require no vehicle battery connections. Most healthy paddlers reach full working pressure within eight to ten minutes of steady pumping.
In contrast, a twelve-volt electric paddle board pump eliminates physical exertion before your paddling session. First, you plug the compressor into your vehicle auxiliary power port and set your target PSI. Then, the electric pump shuts off automatically once the internal sensor reaches fifteen PSI. However, electric pumps are noisy and require direct access to vehicle battery power.
Consequently, many experienced touring paddlers carry both systems in their adventure vehicles. Specifically, they use electric pumps at highway trailheads and keep manual pumps as backups. Always inspect pump hoses and rubber sealing washers for cracking or sand grain abrasion regularly. In addition, clean gaskets guarantee rapid, leak-free inflation every single time you paddle.
Final Sealing and Pre-Launch Inspection
Once your board reaches fifteen PSI, disconnect the pump hose with a sharp counterclockwise twist. You will hear a brief hiss as trapped air escapes from the pump hose. The internal valve spring instantly seals the high-pressure chamber, preserving full board stiffness. Then, wipe any sand grains away from the valve rim using a clean towel.
First, screw the tethered dust cap clockwise until it seals firmly against the gasket. Next, flip the board over onto soft ground to install the slide-in center tracking fin. Then, slide the fin fully into the fin box and secure the safety pin. Finally, your ROC board is now fully rigged, structurally rigid, and ready for launching.
Frequently Asked Questions
What is the recommended PSI for a ROC paddle board?
Inflate your ROC paddle board between twelve and fifteen PSI for optimal water performance.
Why is my pressure gauge not registering during initial pumping?
The gauge needle only starts moving once internal board pressure exceeds seven PSI.
What should you do if air escapes when removing the hose?
Make sure the center valve push-pin is popped up before connecting the hose.
Can you over-inflate a ROC paddle board with a hand pump?
No, manual hand pumps create too much physical resistance to accidentally over-inflate.
How long does it take to inflate the board manually?
It takes approximately eight to ten minutes of steady pumping to reach fifteen PSI.
Conclusion
Inflating your ROC inflatable paddle board to proper pressure guarantees exceptional stability and glide on the water. Following proper valve procedures, ergonomic pumping strokes, and pressure calibration safeguards your board across countless adventures. Furthermore, respecting ambient temperature dynamics ensures long-lasting durability for your military-grade drop-stitch PVC. Inflate your board to fifteen PSI today and explore your favorite coastlines with total confidence!

